instructions for foot peel mask

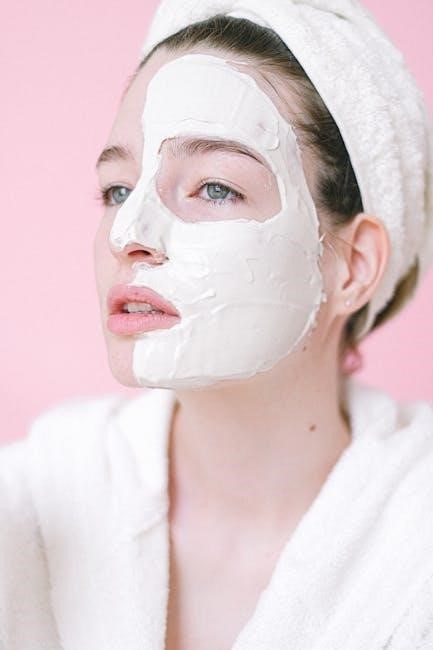
Foot peel masks are a popular self-care trend designed to exfoliate and soften rough skin on feet․ They offer an easy‚ at-home solution for achieving smooth‚ healthy-looking feet;

1․1 What is a Foot Peel Mask?

A foot peel mask is a cosmetic treatment designed to exfoliate and soften the skin on feet․ Typically packaged as boot-like wraps‚ these masks contain active ingredients like alpha-hydroxy acids (AHAs) or beta-hydroxy acids (BHAs) that gently remove dead skin cells․ They are applied to clean‚ dry feet‚ left on for a specified time‚ and then rinsed off․ The peeling effect occurs days later‚ revealing smoother skin․ Foot peel masks are popular for addressing rough patches‚ cracked heels‚ and calluses‚ offering an easy‚ at-home alternative to professional treatments․ They are also formulated to moisturize and hydrate the skin for long-lasting softness․

1․2 Benefits of Using a Foot Peel Mask

Using a foot peel mask offers numerous benefits‚ including deep exfoliation of dead skin cells‚ revealing smoother and softer feet․ It effectively addresses rough patches‚ cracked heels‚ and calluses‚ leaving skin hydrated and refreshed․ The active ingredients in the mask‚ such as AHAs or BHAs‚ gently break down tough skin layers‚ promoting cell turnover․ Regular use can improve foot comfort‚ enhance aesthetic appeal‚ and reduce friction-related issues․ Additionally‚ foot peel masks are convenient‚ requiring minimal effort compared to manual exfoliation․ They provide long-lasting hydration‚ making them an excellent addition to any self-care or beauty routine․

Preparation for Using a Foot Peel Mask

Before applying a foot peel mask‚ thoroughly cleanse your feet and soak them in warm water for 10-15 minutes to soften the skin․

2․1 Cleansing Your Feet Before Application

Properly cleansing your feet before using a foot peel mask ensures optimal results․ Start by washing your feet with a mild soap and warm water to remove dirt and oils․ Pay special attention to areas between the toes and under the nails‚ where grime tends to accumulate․ Rinse thoroughly and pat dry with a clean towel․ Cleansing creates a clean canvas for the mask to adhere evenly‚ allowing active ingredients to penetrate more effectively․ This step is crucial for maximizing the mask’s exfoliating and nourishing benefits‚ leading to softer‚ smoother skin after peeling․

2․2 Soaking Your Feet to Soften the Skin

Soaking your feet before applying a foot peel mask is essential for achieving the best results․ Fill a basin or foot bath with warm water‚ ensuring it covers your feet completely․ Soak for 10 to 15 minutes to soften the skin and loosen dead cells․ For enhanced benefits‚ you can add Epsom salts or a few drops of essential oils like lavender or tea tree․ This step prepares the skin for the mask‚ making it more receptive to exfoliation and nourishment․ Softened skin allows the active ingredients to penetrate deeper‚ leading to a more effective peeling process․

Applying the Foot Peel Mask

To apply the foot peel mask‚ slip your feet into the booties and secure them snugly․ Keep them on for 20-30 minutes‚ then rinse thoroughly․

3․1 How to Properly Wear the Mask

To properly wear a foot peel mask‚ start by ensuring your feet are clean and dry․ Carefully slip each foot into the provided booties‚ aligning your heels and toes with the mask’s contours․ Gently press the edges to secure the mask tightly around your feet‚ ensuring no wrinkles or air pockets․ Make sure the mask is snug but not overly tight to avoid discomfort․ Once applied‚ relax and let the mask work for the recommended 20-30 minutes․ Proper alignment and a snug fit are key for even exfoliation and optimal results․

3․2 Recommended Duration for the Mask

The recommended duration for wearing a foot peel mask varies by product but typically ranges from 20 to 30 minutes․ Some masks may require up to 1․5 hours for optimal results․ Always follow the instructions provided with your specific mask‚ as overuse can lead to irritation․ After the recommended time‚ remove the mask and rinse your feet with warm water․ Avoid leaving it on longer than suggested‚ as this may cause excessive peeling or discomfort․ Proper timing ensures effective exfoliation without harming your skin․ Stick to the guidelines for the best outcome․
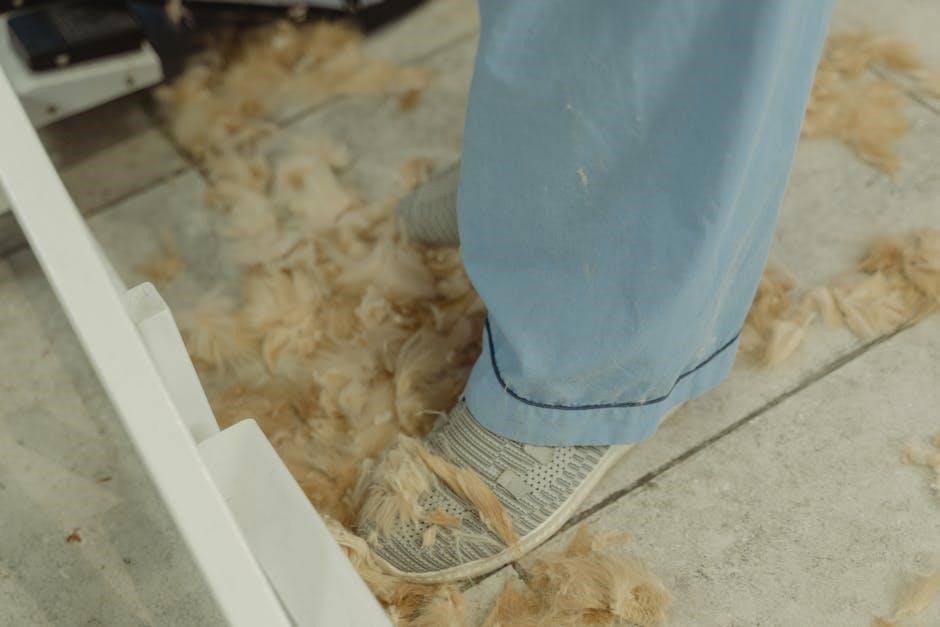
The Peeling Process

The peeling process typically begins within a few days after application‚ with skin gradually shedding over 1-2 weeks․ This reveals smoother‚ softer feet naturally․

4․1 Understanding the Peeling Phenomenon

The peeling phenomenon occurs as the mask’s active ingredients‚ like alpha-hydroxy acids‚ break down dead skin cells․ This process is gradual‚ usually starting a few days post-application․

The skin sheds in layers‚ revealing smoother feet․ It’s essential to avoid manually peeling‚ as this can cause irritation or uneven results․

Proper care‚ such as moisturizing‚ supports the process․ Patience is key‚ as the full effect may take up to two weeks․ This natural exfoliation leaves feet soft and rejuvenated․

4․2 How to Assist the Peeling Process

To support the peeling process‚ avoid manually removing dead skin‚ as this can cause irritation․ Instead‚ gently wash your feet with warm water and a mild soap․

After peeling begins‚ apply a rich moisturizer to hydrate the newly exposed skin․ Soaking your feet in warm water can also help soften remaining dead skin․

For optimal results‚ avoid using harsh exfoliants during this time․ Wearing comfortable‚ breathable shoes can prevent friction and allow the process to unfold naturally․

Gently massaging with a pumice stone after a few days can assist in smoothing rough patches․ Patience is key for achieving the best outcome․

Aftercare Following the Peel

After the peel‚ keep your feet hydrated with a rich moisturizer to maintain softness․ Avoid harsh exfoliants and wear breathable shoes to protect the delicate skin․

5․1 Moisturizing After the Peel

After the peeling process‚ moisturizing is essential to hydrate and protect your newly revealed skin․ Use a rich‚ nourishing foot cream or lotion to lock in hydration and soften the skin․ Ingredients like shea butter‚ coconut oil‚ or vitamin E are particularly effective for dry‚ post-peel feet․ Apply the moisturizer liberally‚ paying special attention to heels and between toes․ Avoid using harsh exfoliants or abrasive products for at least a week to prevent irritation․ Consistent moisturizing will help maintain softness and prevent dryness from returning‚ ensuring long-lasting results from your foot peel mask treatment․

5․2 Protecting Your Skin Post-Peel

After the peel‚ it’s crucial to protect your skin to maintain its health and appearance․ Wear comfortable‚ breathable shoes to avoid friction and irritation․ Avoid direct sunlight on freshly peeled skin‚ as it may cause sensitivity․ Apply a broad-spectrum SPF if your feet will be exposed to the sun․ Refrain from using harsh exfoliants or abrasive products for at least a week․ Instead‚ opt for gentle cleansers and moisturizers․ Keep your feet clean and dry to prevent infections․ By safeguarding your skin post-peel‚ you ensure a smoother‚ healthier finish and prolong the benefits of the treatment․

Safety and Precautions

Foot peel masks are generally safe but may cause irritation in some individuals․ Avoid using if you have open wounds‚ sensitive skin‚ or allergies to ingredients․ Always follow instructions to minimize risks and ensure the best results․

6․1 Who Should Avoid Using a Foot Peel Mask

Certain individuals should avoid using foot peel masks to prevent adverse reactions․ These include people with open sores‚ cuts‚ or sensitive skin‚ as the peeling agents can cause irritation․ Those allergic to ingredients like salicylic acid or urea should also avoid use․ Pregnant women and breastfeeding mothers should consult a healthcare provider before applying any chemical-based products․ Additionally‚ individuals with conditions like eczema or psoriasis may find the peel too harsh‚ leading to discomfort or worsening of symptoms․ It’s essential to prioritize skin health and safety before using such products․

6․2 Potential Side Effects and Allergic Reactions

Common side effects of foot peel masks include mild irritation‚ redness‚ or a stinging sensation during or after use․ Some users may experience dryness or flakiness as the peeling process progresses․ Allergic reactions can occur‚ particularly if sensitive to ingredients like salicylic acid or urea․ Symptoms may include severe itching‚ rashes‚ or blisters․ In rare cases‚ the skin may peel excessively‚ leading to discomfort․ To minimize risks‚ perform a patch test before full application and follow instructions carefully․ Discontinue use if any adverse effects persist or worsen‚ and consult a dermatologist if necessary․

Selecting the Right Product

Choosing the right foot peel mask involves considering your skin type‚ desired results‚ and ingredient preferences․ This section guides you in selecting the best product for optimal outcomes․

7․1 Ingredients to Look For

When selecting a foot peel mask‚ look for ingredients like alpha-hydroxy acids (AHAs) such as glycolic or lactic acid‚ which gently exfoliate and soften rough skin․ Urea is another key ingredient‚ known for its moisturizing and keratolytic properties‚ helping to break down dead skin cells․ Salicylic acid is also beneficial for its ability to penetrate deep into pores and reduce inflammation․ Additionally‚ hyaluronic acid can help retain moisture‚ leaving feet smooth and hydrated․ Avoid products with harsh chemicals that may irritate sensitive skin․ Always choose a mask that aligns with your skin type and needs for the best results․

7․2 Choosing the Best Mask for Your Skin Type

When selecting a foot peel mask‚ consider your skin type to ensure optimal results․ For normal skin‚ look for masks with a balanced blend of AHAs and moisturizers․ If you have dry skin‚ opt for masks rich in hyaluronic acid or urea to lock in hydration․ Sensitive skin benefits from fragrance-free‚ gentle formulas with soothing ingredients like aloe vera․ For oily skin‚ masks containing salicylic acid are ideal as they help control oil and prevent clogged pores․ Always read ingredient labels and choose a mask tailored to your skin type to avoid irritation and achieve the best outcomes․

Common Mistakes to Avoid

Overexfoliation and improper application are common mistakes․ Avoid using the mask too frequently or leaving it on longer than recommended to prevent irritation and dryness․

8․1 Overexfoliation and Its Consequences

Overexfoliation is a common mistake when using foot peel masks․ It can lead to raw‚ irritated skin and prolonged healing times․ Using the mask too frequently or leaving it on longer than instructed strips away too many skin layers‚ causing discomfort․ This can result in dryness‚ redness‚ and even infections if the skin barrier is compromised․ It’s essential to follow the recommended time and frequency to avoid these issues and maintain healthy‚ smooth feet․ Proper care ensures the mask works effectively without harming your skin․

8․2 Improper Application Techniques

Improper application of foot peel masks can reduce effectiveness and cause discomfort․ Common mistakes include not cleansing feet beforehand‚ which prevents the mask from adhering properly․ Failing to soak feet sufficiently can also hinder the peeling process․ Additionally‚ applying the mask too frequently or leaving it on beyond the recommended time can irritate the skin․ To avoid these issues‚ always follow the instructions carefully‚ ensure your feet are clean and dry before application‚ and avoid overuse․ Proper technique ensures the mask works effectively without causing harm․

brioche stitch tutorial

The Brioche Stitch is a versatile knitting technique known for its rich texture and visual appeal. It creates a fabric with alternating knit and purl rows, offering a unique, reversible design. Perfect for beginners and experienced knitters alike, this stitch adds depth and elegance to any project. Its origins trace back to European knitting traditions, making it a timeless choice for crafting beautiful garments and accessories.

What is Brioche Stitch?

The Brioche Stitch is a knitting technique that creates a fabric with a raised, textured appearance. It involves alternating columns of knit and purl stitches, often combined with yarnovers and slipped stitches. This unique combination results in a fabric that is both visually striking and reversible, making it ideal for scarves, hats, and other projects where both sides are visible. The stitch is known for its lofty and elastic texture, which adds warmth and comfort to knitted items. Brioche Stitch can be worked in single or multiple colors, offering endless creative possibilities. While it may seem complex, the basic principle involves simple row repeats, making it accessible to knitters of all skill levels. This stitch is a great way to add depth and visual interest to any knitting project.

History and Origin of Brioche Knitting

The Brioche Stitch has its roots in European knitting traditions, with its origins tracing back to the 19th century. It gained popularity in the early 20th century as knitters sought unique textures for garments. The name “Brioche” is believed to have been inspired by the French bread of the same name, due to the stitch’s airy, layered appearance. This technique was often used in men’s sweaters and accessories, prized for its warmth and visual appeal. Over time, knitters have experimented with the stitch, leading to variations like double Brioche and two-color designs. Its enduring popularity lies in its versatility and the distinctive fabric it creates, making it a cherished technique among knitters worldwide. The Brioche Stitch remains a testament to the evolution of knitting artistry and tradition.

Basic Brioche Stitch Techniques

The Brioche Stitch involves alternating knit and purl rows with yarnovers and slipped stitches. It creates a textured, reversible fabric. Swatching is essential to master tension and stitch consistency.

Single-Color Brioche Stitch Tutorial

Learning the single-color Brioche Stitch is an excellent starting point for beginners. Start by casting on an even number of stitches. In the first row, knit one stitch, then slip the next stitch while adding a yarnover. Repeat this pattern until the end of the row. On the return row, purl the first stitch, then purl the slipped stitch together with the yarnover from the previous row. This creates the signature Brioche texture. Maintaining consistent tension is crucial to ensure the fabric lies smoothly. Practice this technique with a swatch to build confidence before moving on to more complex variations like two-color Brioche or advanced patterns.

Two-Color Brioche Stitch Tutorial

The two-color Brioche Stitch builds on the single-color technique, adding a vibrant, multi-tonal dimension. Begin by casting on an even number of stitches and prepare two contrasting yarns. In the first row, knit one stitch with the first color, slip the next stitch while adding a yarnover with the second color. Alternate colors for each pair of stitches. On the return row, purl the first stitch with the first color, then purl the slipped stitch and yarnover together with the second color. This creates a striking, reversible fabric with a dynamic interplay of colors. To maintain clarity, ensure consistent tension and avoid mixing yarns improperly. Practice this technique to master the vibrant, two-color Brioche effect for scarves, hats, or other accessories.

Common Mistakes and Troubleshooting

Common errors in Brioche Stitch include miscounting stitches, uneven tension, and incorrect yarnovers. To fix, ensure consistent tension and count stitches regularly. Adjust yarnovers carefully to maintain fabric integrity;

Recognizing and Fixing Common Errors

Recognizing common errors in brioche stitch is crucial for maintaining fabric consistency. One frequent mistake is miscounting stitches, leading to uneven rows. To fix this, count stitches after each row and ensure proper yarnover placement. Another issue is inconsistent tension, which can cause puckering or looseness. Pay attention to how tightly or loosely you hold the yarn. Dropping stitches or mismanaging yarnovers can also disrupt the pattern. If a mistake is found, frogging back to the error and reknitting is often the best solution. Regularly checking work and maintaining patience will help master the brioche stitch effectively.

Tips for Maintaining Tension and Fabric Consistency

Maintaining consistent tension is key to mastering the brioche stitch. Start by using the correct needle size for your yarn to ensure fabric evenness. Swatch before beginning a project to gauge your tension and adjust as needed. Keep the yarn at a steady tension while knitting, avoiding pulling too tightly or loosely. Regularly check your work to ensure rows align and stitches are uniform. Practice knitting with a relaxed grip to prevent puckering or loose fabric. Blocking the finished project can also help even out the texture. By focusing on consistent tension, you’ll achieve a smooth, professional-looking brioche fabric that drapes beautifully and retains its shape.

Brioche Stitch Projects

Brioche stitch is perfect for creating stylish scarves, hats, and blankets. Its reversible texture makes it ideal for garments and home decor, appealing to knitters of all levels.

Choosing the Right Yarn and Needles

Selecting the right yarn and needles is crucial for achieving the desired texture in brioche knitting. Worsted weight yarns with good stitch definition, such as merino wool or blends, work best. Avoid overly fuzzy or slippery yarns, as they can complicate stitch visibility. For needles, choose sizes that create a fabric with moderate drape—typically between US 6-8 (4-5mm). Swatching is essential to ensure proper tension and stitch clarity. Circular or straight needles can be used, but circulars are ideal for larger projects. Experiment with needle materials like aluminum or wood to find what suits your knitting style. Proper tools and materials will enhance your brioche knitting experience, ensuring a beautiful and professional finish for your projects.

Simple Brioche Stitch Patterns for Beginners

Starting with simple brioche stitch patterns is ideal for beginners. Begin with a single-color scarf or cowl to practice the basic stitch repetition. These projects are great for learning how to handle the stitch’s unique texture without the complexity of multiple colors. A baby blanket or dishcloth is another excellent option, as they require minimal shaping and allow you to focus on mastering the stitch. For a small project, try a brioche headband, which introduces two-color work in a manageable way. Always start with a swatch to ensure proper tension and stitch clarity. These patterns are perfect for building confidence and laying a strong foundation for more complex brioche designs. Choose yarns with good stitch definition for the best results.

Advanced Variations and Tips

Explore advanced techniques like double brioche stitch and incorporating cables or lace for intricate designs. These methods enhance texture and visual interest, offering limitless creative possibilities for experienced knitters.

Double Brioche Stitch and Other Variations

The double brioche stitch is an advanced variation that creates a thicker, more textured fabric by working two layers of brioche stitches. This technique involves slipping stitches and working yarnovers in a specific sequence, resulting in a luxurious, reversible fabric. Other variations include the syncopated brioche, which plays with stitch timing, and the waffle brioche, combining knit and purl stitches for a grid-like texture. These variations add complexity and visual interest to projects. Experimenting with different yarn weights and needle sizes can further enhance the fabric’s drape and texture. Mastering these techniques opens up endless possibilities for creating unique, high-fashion knits.

Adding Cables or Lace to Brioche Stitch

Enhancing brioche fabric with cables or lace adds intricate visual interest and texture. Cables can be integrated by crossing stitches over each other, creating a dynamic, three-dimensional effect. Lace patterns, with their yarnovers and decreases, introduce an airy, contrasting element to the dense brioche fabric. Combining these techniques requires careful planning, as cables and lace must align with the brioche stitch rhythm. This advanced approach is ideal for experienced knitters seeking to push their skills further. The result is a sophisticated, multi-textured fabric that showcases the versatility of brioche knitting. These combinations are perfect for creating unique garments or accessories with a modern, elegant aesthetic;

weber genesis grill instruction manual

Welcome to the Weber Genesis Grill Instruction Manual․ This guide provides essential information for safe assembly, operation, and maintenance of your grill․ Learn to utilize its advanced features, including high-performance burners and the sear station, to enhance your grilling experience․ Follow these instructions to ensure optimal performance and troubleshoot common issues effectively․

Importance of Reading the Manual

Reading the Weber Genesis Grill Instruction Manual is crucial for safe and effective use of your grill․ It provides detailed safety guidelines, assembly steps, and operating instructions to ensure optimal performance․ Understanding the manual helps prevent accidents, proper assembly, and maintenance, extending the grill’s lifespan․ It also covers troubleshooting tips and warranty information․ By following the manual, you can master advanced features like the sear station and heat control, enhancing your grilling experience․ Always refer to the manual before attempting assembly or operation to avoid risks and ensure longevity of your Weber Genesis Grill․

Safety Guidelines and Precautions

Ensure safe grilling by following essential safety guidelines․ Avoid open flames, ensure proper ventilation, and never use the grill in confined spaces․ Always follow assembly and operation instructions carefully․

General Safety Instructions

Always prioritize safety when using your Weber Genesis Grill․ Ensure the grill is placed on a stable, heat-resistant surface and keep it away from flammable materials․ Never leave the grill unattended while in operation, especially when children or pets are nearby․ Keep a fire extinguisher or water source within reach․ Avoid wearing loose clothing that could catch fire, and use long-handled utensils to maintain a safe distance from heat․ Properly preheat the grill and ensure all connections are secure before igniting․ Follow the manufacturer’s guidelines for gas handling and electrical components to prevent accidents․

Regularly inspect the grill for damage or wear, such as cracked hoses or rusted burners, and address these issues promptly․ Store propane tanks upright and in a well-ventilated area, away from direct sunlight or heat sources․ Never store grilling accessories or flammable liquids near the grill․ Always turn off the burners and allow the grill to cool completely before cleaning or covering it․ Adhere to these precautions to ensure a safe and enjoyable grilling experience․

Gas Safety Tips

Ensure your Weber Genesis Grill operates safely by following gas safety guidelines․ Always turn off the gas supply immediately if you detect any leaks or unusual odors․ Use a gas leak detector to inspect connections regularly․ Never use an open flame or spark near the grill when checking for leaks․ Store propane tanks upright in a well-ventilated, cool area, away from direct sunlight and heat sources․ Keep the grill at least 10 feet away from any structure․ Always follow the manufacturer’s instructions for connecting and disconnecting gas hoses and tanks․ If you smell gas, shut off the supply, open the lid, and avoid igniting the grill until the issue is resolved․ Regularly inspect gas lines and connections for signs of wear or damage and replace them if necessary․

In case of a gas emergency, never attempt to repair leaks yourself․ Contact a qualified technician or the manufacturer for assistance․ Always use genuine Weber replacement parts to ensure compatibility and safety․ Familiarize yourself with local gas safety regulations and adhere to them strictly․

Assembly Precautions

Before assembling your Weber Genesis Grill, ensure the surface is flat, level, and soft to prevent damage․ Remove all protective films from stainless steel parts prior to installation․ Avoid using power tools, as they may strip screws or damage components․ Never assemble the grill on uneven ground or near open flames․ Keep children and pets away during assembly to avoid accidents․ Double-check all parts against the inventory list to ensure nothing is missing or damaged․ Follow the step-by-step instructions carefully, and do not skip any steps․ If unsure about any part of the process, consult the manual or contact Weber support for assistance․

Proper assembly is critical for safety and performance․ Misaligned or loose parts can lead to gas leaks or uneven heating․ Use only genuine Weber parts and tools recommended in the manual․ Avoid over-tightening bolts or screws, as this may damage the grill’s frame or components․ If you notice any wear or damage during assembly, stop immediately and address the issue before proceeding․ Always refer to the manual for specific torque specifications and assembly diagrams to ensure accuracy and safety throughout the process․

Assembly Steps for the Weber Genesis Grill

Begin with unboxing and inventorying all parts․ Follow the step-by-step guide for basic assembly, ensuring all components are securely attached․ Refer to the manual for diagrams and specific instructions to complete the setup efficiently․

Unboxing and Inventory of Parts

Start by carefully unboxing your Weber Genesis Grill and laying out all components on a flat, soft surface to avoid scratching․ Use the provided inventory list to account for every part, ensuring nothing is missing or damaged․ Check for protective packaging and remove any covering materials, especially from stainless steel surfaces․ Organize smaller hardware like bolts and screws in a designated container for easy access․ Cross-reference each item with the manual’s parts diagram to confirm completeness․ This step is crucial for a smooth assembly process and to prevent delays․ Take your time to ensure all parts are accounted for before proceeding․

Basic Assembly Process

Begin by assembling the grill’s frame on a level, stable surface․ Attach the legs and wheels securely, ensuring stability․ Next, install the burner tubes and ignition system, following the manual’s step-by-step guide․ Carefully place the cooking grates and heat deflectors, ensuring proper alignment․ Connect the gas lines and tighten all connections firmly․ Refer to the provided diagrams for accurate placement of components․ Double-check that all screws and bolts are tightened to avoid loose parts․ Avoid using power tools, as they may strip screws․ Once the base is assembled, attach the lid and handle, ensuring smooth operation․ Follow the sequence carefully to build a sturdy foundation for your grill․

Installing Additional Features

After the basic assembly, install any additional features such as the sear station burner, side burners, or smart grilling technology․ For the sear station, attach the burner to the designated area and connect the gas line as shown in the manual․ If your model includes a side burner, mount it to the cart and secure it with the provided hardware․ For smart features, pair the grill with your smartphone using the Weber app․ Ensure all connections are tight and test each feature before use․ Refer to the specific instructions for each accessory to ensure proper installation and function․ Always follow safety guidelines when adding or connecting new components․

Operating the Weber Genesis Grill

Operating your Weber Genesis Grill involves proper ignition, heat control, and utilizing special features like the sear station for enhanced grilling performance and even heat distribution․

Ignition and Lighting Instructions

Before lighting your Weber Genesis Grill, ensure the lid is open and all burner knobs are in the “off” position․ Turn the burner knob to the “light” position and press the igniter․ If the burner does not light, wait a few seconds and try again․ Never lean over the grill to light it․ For models with a sear station, follow the same ignition process․ Always ensure the grill is preheated with the lid closed for 10-15 minutes before cooking․ Refer to specific model instructions for any variations in the ignition process․

Heat Control and Temperature Management

Managing heat on your Weber Genesis Grill is straightforward․ Use the burner knobs to adjust individual burners for precise temperature control․ Preheat the grill with the lid closed for 10-15 minutes before cooking․ Monitor the built-in thermometer to maintain desired temperatures․ For even cooking, ensure the grill grates are clean and properly preheated․ Adjust burners to lower or higher settings as needed during cooking․ Always keep the lid closed when not actively flipping food to retain heat․ This ensures consistent cooking results and prevents temperature fluctuations․ Proper heat control is key to achieving perfectly grilled dishes every time․

Using Special Features (Sear Station, etc․)

The Weber Genesis Grill offers advanced features like the Sear Station, designed for high-heat searing to lock in flavors․ To use it, preheat the Sear Station for 5 minutes before placing meat․ Use the ignition button for quick burner lighting․ The grill also features Flavorizer Bars, which vaporize drippings for enhanced taste․ For even cooking, utilize the warming rack to keep dishes ready․ Explore these features to elevate your grilling experience and achieve professional-level results; Always refer to the manual for specific instructions on using these features safely and effectively․

Maintenance and Care

Regular maintenance ensures your Weber Genesis Grill performs optimally․ Clean grates and Flavorizer Bars after each use, and wipe down surfaces with a mild detergent․ Store the grill in a dry place during off-seasons and protect it with a cover to prevent rust․ Replace worn-out parts promptly to maintain efficiency and safety․ Follow the manual’s guidelines for deep cleaning and seasonal preparation to extend the grill’s lifespan and keep it in pristine condition for years of enjoyable grilling experiences․

Cleaning the Grill

Cleaning your Weber Genesis Grill is essential for maintaining its performance and longevity․ Always brush the grates with a grill brush while they are still warm to remove food residue․ Wipe down the exterior with a mild detergent and water, avoiding abrasive cleaners that could damage the finish․ Clean the Flavorizer Bars and drip tray regularly to prevent grease buildup․ For tougher stains, mix baking soda and water to create a paste, apply it to the affected areas, and let it sit before scrubbing․ Deep clean the grill every few months by removing all components and soaking them in warm soapy water․ Regular cleaning ensures optimal grilling results and prevents rust and damage․ Use Weber-approved cleaning products for the best outcomes․

Seasonal Preparation and Storage

Proper seasonal preparation and storage of your Weber Genesis Grill are crucial for maintaining its longevity․ Before storing, ensure the grill is clean and dry to prevent rust․ Disconnect the propane tank and store it separately in a well-ventilated area․ Use a durable grill cover to protect the unit from weather elements․ Store the grill in a dry, protected location, such as a garage or shed․ For winter storage, consider lubricating moving parts and covering the vents to keep pests out․ Always follow the manufacturer’s guidelines for seasonal maintenance to ensure your grill remains in excellent condition year-round․

Replacing Parts and Accessories

Regularly inspect and replace worn or damaged parts to maintain your Weber Genesis Grill’s performance․ Clean or replace the grates, burners, and flavorizer bars as needed․ Use genuine Weber accessories to ensure compatibility and safety․ For gas-related components, always follow the manual’s instructions to avoid leaks or hazards․ Lubricate moving parts annually to maintain smooth operation․ Store spare parts in a dry place to prevent rust․ Refer to the manual for specific replacement procedures and diagrams․ Properly dispose of old parts and accessories․ Keep a list of model-specific replacement items for easy ordering․ Always prioritize safety when handling grill components and accessories․

Troubleshooting Common Issues

If you encounter issues like uneven heating or ignition problems, refer to the manual for diagnostic steps․ Addressing these promptly ensures optimal grill performance and safety․

Identifying and Solving Common Problems

Identifying issues early ensures your Weber Genesis Grill performs optimally․ Common problems include uneven heating, ignition failures, or gas leaks․ If the burners don’t light, check the ignition electrodes for dirt or damage․ For uneven heat, ensure the grill is preheated properly and the cooking grates are clean․ If you smell gas, shut off the supply immediately and inspect hoses for damage․ Always refer to the manual’s troubleshooting section for step-by-step solutions․ Addressing these issues promptly prevents larger problems and extends the grill’s lifespan․

  • Check burner performance and clean if necessary․
  • Ensure the grill is on a level surface for even heat distribution․
  • Inspect gas lines for leaks using a soap solution․

Consult the manual or contact Weber support for persistent issues․

Diagnostics and Repair Steps

Diagnostics begin with observing your grill’s performance․ If burners fail to ignite, check the ignition electrodes for cleanliness and alignment․ For uneven heating, inspect the burner tubes for blockages and clean them if necessary․ Gas leaks can be detected using a soap solution applied to hoses; bubbles indicate a leak․ Replace damaged hoses immediately․ Always turn off the gas supply before attempting repairs․ If issues persist, consult Weber’s customer support or a certified technician․ Regular maintenance, like cleaning burners and checking connections, prevents most problems․

  • Inspect ignition electrodes for dirt or misalignment․
  • Clean burner tubes to ensure proper gas flow․
  • Replace any damaged or worn-out parts promptly․

Refer to the manual for detailed repair guidance․

By following this manual, you’ll ensure safe and efficient use of your Weber Genesis Grill․ Proper maintenance and troubleshooting will extend its lifespan․ Happy grilling!

Final Tips for Optimal Use

For the best grilling experience, always preheat your Weber Genesis Grill to ensure even heat distribution․ Regularly clean the grates and burners to maintain performance․ Store the grill properly during off-seasons to prevent damage․ Experiment with the sear station for crispy finishes and utilize the app for recipe inspiration․ Register your grill for extended support and updates․ Remember to follow safety guidelines and enjoy your outdoor cooking adventures with friends and family!

overhead door model 2026 manual

Welcome to the Overhead Door Model 2026 Manual. This guide provides essential information for installing, operating, and maintaining your garage door opener; It covers programming, troubleshooting, and safety features to ensure optimal performance.

Key Features and Benefits of the Overhead Door Model 2026

The Overhead Door Model 2026 is a reliable and efficient garage door opener designed to provide smooth operation and enhanced security. It features a robust motor, quiet performance, and advanced safety sensors to ensure safe and reliable use. The opener is compatible with smart home technology, allowing seamless integration with your home automation system. Additionally, it includes a user-friendly remote control and a secure rolling code system to prevent unauthorized access. The Model 2026 also offers energy-efficient operation and durable construction, making it a long-lasting solution for your garage door needs. The manual provides detailed guidance on how to maximize these features, ensuring optimal performance and user satisfaction. With its combination of innovation and reliability, the Overhead Door Model 2026 is an excellent choice for homeowners seeking a modern and dependable garage door opener.

Understanding the Overhead Door Model 2026 Manual Structure

The Overhead Door Model 2026 manual is designed to be user-friendly, providing clear instructions and detailed information. It begins with an introduction, followed by key features and benefits. The manual then guides users through programming their garage door opener, offering step-by-step instructions for a seamless setup process. Troubleshooting common issues is also covered, with specific sections addressing problems like door reversal or improper closing. Maintenance tips are included to ensure longevity and optimal performance. Additionally, the manual outlines safety features and precautions, emphasizing user protection. For convenience, it also explains how to download the manual digitally. Compatibility with smart home technology is discussed, highlighting integration possibilities. The structure is logical, making it easy to navigate and find specific information quickly. Whether you’re installing, operating, or maintaining the Model 2026, the manual serves as a comprehensive guide tailored to meet all your needs.

Programming Your Overhead Door Model 2026 Garage Door Opener

Programming the Model 2026 involves syncing your remote and ensuring proper function. Press the “Learn” button, then sync your remote within 30 seconds. Follow manual instructions for a smooth setup.

  1. Locate the “Learn” button on the opener, typically found near the antenna.
  2. Press and release the “Learn” button to enter programming mode.
  3. Within 30 seconds, press and hold the remote control button until the opener lights blink.
  4. Release the remote button and test the opener to ensure it responds correctly.
  5. If using a vehicle’s built-in system, refer to your car’s manual for syncing instructions.
  6. After successful programming, the opener is ready for use.

Follow these steps to ensure proper programming and functionality of your Overhead Door Model 2026 opener.

Troubleshooting Common Issues with the Overhead Door Model 2026

Check the door’s close limit settings if it reverses or doesn’t close properly. Ensure the door is balanced and sensors are clean. Refer to the manual for detailed diagnostic steps and solutions.

Diagnosing Why the Door Reverses or Doesn’t Close Properly

If your Overhead Door Model 2026 reverses or fails to close, start by checking the close limit settings. Ensure they are properly programmed to match your door’s specific needs. Next, inspect the safety sensors for cleanliness and alignment. Dirty or misaligned sensors can trigger unexpected reversals. Additionally, verify the door’s balance, as an unbalanced door can cause improper closing. Finally, examine the opener’s force settings. If the closing force is set too low, the door may not shut completely. Adjust these settings as needed, following the manual’s instructions. Regular maintenance, such as lubricating hinges and rollers, can also prevent issues. Always refer to the manual for detailed troubleshooting steps tailored to your Model 2026 opener.

Maintenance Tips for the Overhead Door Model 2026

Step-by-Step Instructions for Programming the Opener

Programming your Overhead Door Model 2026 opener is a straightforward process. Start by locating the “Learn” button on the opener, typically found near the antenna. Ensure your remote control is ready for programming. Press and release the “Learn” button, then immediately press and hold the remote button you wish to program. Hold until the opener’s lights blink, indicating successful programming. Test the remote to ensure proper function. For additional remotes, repeat the process within 30 seconds of the first remote’s programming. If needed, erase old codes by holding the “Learn” button for 10 seconds. Always refer to the manual for visual guides or contact support for assistance. Regularly check and update your opener’s programming to maintain optimal performance and security.

How to Download the Overhead Door Model 2026 Manual

Downloading the Overhead Door Model 2026 manual is a simple process. Visit the official Overhead Door website and navigate to the “Support” or “Resources” section. Look for a link labeled ” Manuals” or “Downloads.” Enter “Model 2026” in the search bar to find the specific manual. Select the appropriate file format, typically PDF, and click “Download.” Ensure you are on the official website to avoid third-party sources. Once downloaded, save the manual to your device for easy access. If you encounter issues, contact Overhead Door customer support for assistance. Regularly check for updates to ensure you have the latest version of the manual. This guide will help you troubleshoot, program, and maintain your garage door opener effectively. Always verify the manual’s authenticity to ensure compatibility with your Model 2026 opener.

Compatibility and Integration with Smart Home Technology

The Overhead Door Model 2026 is designed to integrate seamlessly with smart home systems, enhancing convenience and control. Users can connect their garage door opener to popular platforms like Apple HomeKit or Google Home, allowing voice commands and remote monitoring. The MyQ App enables smartphone control, providing real-time notifications and the ability to open or close the door from anywhere. For smart integration, an additional bridge or hub may be required, depending on the system. This feature is ideal for homeowners seeking a modern, connected lifestyle. The manual outlines steps for syncing the opener with smart devices, ensuring compatibility and ease of use. Always verify compatibility with your specific smart home system before setup. By integrating the Model 2026 with smart technology, users can enjoy enhanced security and convenience, making it a versatile choice for tech-savvy households. Regular updates ensure optimal performance with evolving smart home trends.

Safety Features and Precautions Outlined in the Manual

The Overhead Door Model 2026 Manual emphasizes safety to ensure secure and reliable operation. Key features include automatic reversal if the door detects an obstruction, reducing accident risks. The manual also highlights essential precautions, such as regular maintenance checks and proper installation to prevent malfunctions. Users are advised to keep remote controls out of children’s reach and to test the door’s reversal mechanism monthly. Additionally, the manual warns against attempting repairs without proper tools or knowledge, as this could lead to injury or further damage. It also stresses the importance of ensuring the door is properly balanced and aligned to avoid unexpected behavior. Always follow the recommended safety guidelines to guarantee safe and efficient operation of your garage door opener. By adhering to these precautions, you can minimize risks and enjoy long-term reliability from your Overhead Door Model 2026.

Common Problems and Solutions for the Overhead Door Model 2026

Common issues include door reversal, improper closing, and remote malfunctions. Check sensor alignment, ensure proper door balance, and reset or reprogram the opener if necessary to resolve these problems effectively.

Addressing Remote Control and Sensor Issues

Remote control and sensor problems are common with the Overhead Door Model 2026. If the remote fails to operate the door, ensure batteries are fresh and check for interference from nearby devices. Sensors may malfunction due to misalignment or dirt. Clean sensor lenses and verify proper alignment. If issues persist, reset the opener by disconnecting power and reconnecting it. Programming the remote again may also resolve connectivity problems. For persistent sensor issues, consult the manual for detailed troubleshooting steps or contact customer support for assistance. Regular maintenance of these components ensures smooth operation and safety of your garage door system.

The Overhead Door Model 2026 Manual is a comprehensive resource designed to help users maximize the potential of their garage door opener. From installation and programming to troubleshooting and maintenance, the manual provides clear, step-by-step guidance. It emphasizes safety, highlighting essential precautions to ensure secure operation. By following the manual’s instructions, users can resolve common issues, such as remote control malfunctions or sensor misalignment, and keep their system running smoothly. The manual also explores compatibility with smart home technology, making it a forward-thinking guide. Whether you’re a new user or someone looking to optimize performance, this manual is an invaluable tool. Regular maintenance and adherence to the guidelines will extend the lifespan of your garage door opener. Overall, the Overhead Door Model 2026 Manual is a user-friendly and detailed guide that supports a seamless experience for homeowners.

twin over twin metal bunk bed assembly instructions pdf

Assembling a Twin Over Twin Metal Bunk Bed requires careful planning and attention to detail. This guide provides a comprehensive step-by-step approach to ensure safety‚ stability‚ and proper assembly. Follow the instructions closely to avoid mistakes and guarantee a sturdy structure for years of use.

Overview of the Bunk Bed Structure

The Twin Over Twin Metal Bunk Bed features a durable‚ space-saving design with two identical twin-sized beds stacked vertically. The structure includes a robust metal frame with extended legs for stability and support arms that secure the upper bunk. Guardrails are integrated for safety‚ ensuring the upper bunk is enclosed. The bed is designed for compact spaces‚ making it ideal for shared rooms or small areas. The frame is constructed from sturdy metal‚ ensuring long-lasting durability and support for both mattresses. This design maximizes room efficiency while maintaining a sleek‚ functional appearance‚ making it a practical choice for various living situations.

Importance of Following Assembly Instructions

Failing to follow the assembly instructions for a Twin Over Twin Metal Bunk Bed can lead to structural instability‚ safety hazards‚ and potential damage to the frame or mattress. Proper assembly ensures the bed meets safety standards‚ preventing accidents like collapses or entrapments. Misaligned parts or loose joints can compromise the bed’s durability and put users at risk; Additionally‚ incorrect assembly may void warranties or lead to premature wear. Always inspect hardware for damage before assembly and address loose joints promptly. Adhering to the instructions guarantees a safe‚ sturdy‚ and functional bed‚ while also ensuring compliance with manufacturer guidelines and safety regulations.

Safety Warnings and Precautions

Inspect the bunk bed regularly for damage or loose joints. Keep sharp objects away from the bed. Ensure the bed is placed on a level surface to prevent tipping and ensure stability.

General Safety Guidelines

Always inspect the bunk bed for damaged hardware‚ loose joints‚ or missing parts before use. Ensure the mattress meets size and thickness requirements to prevent accidents. Place the bed on a level surface to avoid tipping. Adult supervision is recommended during assembly and use. Follow weight limits specified in the instructions to ensure stability. Keep the area around the bed clear to prevent tripping. Avoid placing the bed near windows or balconies to reduce fall risks. Use guardrails on both upper and lower bunks for added safety. Never remove warning labels or instructions provided with the bed.

Prohibited Actions During Assembly and Use

Never exceed the recommended weight limit for the bunk bed to ensure stability. Avoid standing or sitting on the upper bunk railing for safety. Do not use the bed as a ladder or climbing structure. Prohibit children under six years old from using the upper bunk without adult supervision. Never hang objects from the bed frame or guardrails to prevent damage or accidents. Do not assemble or use the bed near windows‚ balconies‚ or other hazards. Avoid altering the bed structure or removing safety features. Do not use the bed if any parts are damaged or missing. Keep sharp objects away from the mattresses and bed frame.

Tools and Parts Required for Assembly

Listing of Essential Tools

To assemble a Twin Over Twin Metal Bunk Bed‚ you will need specific tools to ensure the process is efficient and safe. Start with an Allen wrench (3mm and 5mm) for securing bolts and screws. A screwdriver‚ both Phillips and flathead‚ is essential for handling various fasteners. Additionally‚ a socket wrench or ratchet set may be required for tightening larger bolts. Pliers can assist with gripping small parts‚ while a tape measure helps verify dimensions. Organize all tools beforehand to avoid delays. Ensure you have a sturdy work surface and a second person to assist with heavy components. Double-check that all tools are included before starting the assembly process.

Understanding the Components and Hardware

Familiarizing yourself with the components and hardware is crucial for a successful assembly. The bed frame consists of two twin-sized metal structures‚ one for the upper bunk and one for the lower. Support arms and guardrails are essential for stability and safety‚ attaching securely to the frame. Bolts‚ screws‚ and Allen keys are the primary fasteners‚ ensuring a sturdy connection. Small hardware pieces‚ like washers and spacers‚ prevent wobbling and align parts correctly. Organize all components by labeling them according to the instructions. Understanding each part’s purpose helps in identifying potential issues early‚ ensuring a smooth assembly process and a safe sleeping environment for users.

Step-by-Step Assembly Instructions

Begin by unpacking and organizing all parts. Start with the bed frame‚ attaching legs and support arms. Secure upper and lower bunks‚ ensuring stability. Tighten all bolts firmly but avoid over-tightening. Install guardrails and test the structure’s sturdiness before adding mattresses.

Preparing the Bed Frame and Legs

Begin by carefully unpacking and organizing all components. Lay out the bed frame and ensure it is fully unfolded. Attach the legs securely to the frame using the provided bolts‚ tightening them firmly with an Allen wrench. Rotate the support arms and hook them onto the bolts at each corner for added stability. Double-check that all parts are undamaged and properly aligned. Ensure the frame is level to prevent instability. Inspect for any missing or damaged components before proceeding to the next step.

Attaching Support Arms and Guardrails

Once the bed frame and legs are prepared‚ focus on attaching the support arms and guardrails. Use an Allen wrench to secure the support arms to the bolts at each corner of the frame‚ ensuring they fit snugly and align properly. Tighten firmly to avoid any wobbling. Next‚ install the guardrails along the sides of the upper bunk‚ using the provided screws. These rails provide essential safety by preventing falls. Make sure all connections are tight and the guardrails are evenly spaced. Double-check the alignment and stability before proceeding to the next step. Properly secured support arms and guardrails are critical for the bed’s structural integrity and safety.

Securing the Upper and Lower Bunks

After assembling the support arms and guardrails‚ focus on securing the upper and lower bunks. Use the provided bolts to attach the upper bunk frame to the lower bunk‚ ensuring alignment with the pre-drilled holes. Tighten all connections firmly with an Allen wrench to prevent any movement. Double-check that the upper bunk is evenly positioned and stable. Ensure the mattress support slats are properly fitted and secured to both bunks. Finally‚ verify that all safety rails are tightly fastened and that the bed meets weight and size specifications. Perform a final inspection by gently rocking the structure to confirm stability before use. Always follow the manufacturer’s guidelines for weight limits and safety standards. If any part feels loose‚ tighten it immediately. Properly securing both bunks ensures safety and durability. Keep the assembly manual handy for future adjustments or maintenance. If unsure about any step‚ consult the manual or contact customer support for assistance. Proper assembly is crucial to prevent accidents and ensure the bed lasts for years. Regular inspections and maintenance can help maintain the bed’s stability and safety. Always prioritize safety when assembling and using the bunk bed. If any hardware appears damaged or worn‚ replace it promptly. Use only the hardware and tools provided in the kit to avoid compatibility issues. Avoid over-tightening‚ as this could damage the metal frame; If you notice any squeaks or wobbles‚ check and tighten all connections. Properly securing the bunks ensures a safe and comfortable sleeping environment for users; Always follow the manufacturer’s instructions for the best results. Regularly inspect the bed for any signs of wear or damage‚ and address them promptly. This will help maintain the bed’s structural integrity and extend its lifespan. By following these steps‚ you can ensure the bunk bed is assembled correctly and safely. If you encounter any issues during assembly‚ do not hesitate to seek professional assistance. Proper assembly is essential to prevent accidents and ensure the bed remains stable and secure. Always prioritize safety and follow the instructions carefully. If you are unsure about any part of the process‚ consult the manual or contact customer support for guidance. Properly securing the bunks is a critical step in the assembly process. Take your time and ensure all connections are tight and secure. Avoid rushing through this step‚ as it directly impacts the bed’s safety and stability. Once the bunks are securely attached‚ you can proceed to add the mattresses and bedding. Always use the recommended mattress size and thickness to ensure proper fit and safety. If you plan to move the bed‚ ensure it is fully assembled and secure to prevent any shifting during transport. Regularly check the bed’s condition‚ especially after moving or reassembling it. Properly securing the bunks is the final step in ensuring the bed is safe and ready for use. Always follow the manufacturer’s instructions for the best results. If you notice any issues after assembly‚ address them promptly to maintain the bed’s safety and stability. Properly securing the bunks ensures a safe and comfortable sleeping environment for users. Always prioritize safety and follow the instructions carefully. If you are unsure about any part of the process‚ consult the manual or contact customer support for guidance. Properly securing the bunks is a critical step in the assembly process. Take your time and ensure all connections are tight and secure. Avoid rushing through this step‚ as it directly impacts the bed’s safety and stability. Once the bunks are securely attached‚ you can proceed to add the mattresses and bedding. Always use the recommended mattress size and thickness to ensure proper fit and safety. If you plan to move the bed‚ ensure it is fully assembled and secure to prevent any shifting during transport. Regularly check the bed’s condition‚ especially after moving or reassembling it. Properly securing the bunks is the final step in ensuring the bed is safe and ready for use. Always follow the manufacturer’s instructions for the best results. If you notice any issues after assembly‚ address them promptly to maintain the bed’s safety and stability. Properly securing the bunks ensures a safe and comfortable sleeping environment for users. Always prioritize safety and follow the instructions carefully. If you are unsure about any part of the process‚ consult the manual or contact customer support for guidance. Properly securing the bunks is a critical step in the assembly process. Take your time and ensure all connections are tight and secure. Avoid rushing through this step‚ as it directly impacts the bed’s safety and stability. Once the bunks are securely attached‚ you can proceed to add the mattresses and bedding. Always use the recommended mattress size and thickness to ensure proper fit and safety. If you plan to move the bed‚ ensure it is fully assembled and secure to prevent any shifting during transport. Regularly check the bed’s condition‚ especially after moving or reassembling it. Properly securing the bunks is the final step in ensuring the bed is safe and ready for use. Always follow the manufacturer’s instructions for the best results. If you notice any issues after assembly‚ address them promptly to maintain the bed’s safety and stability. Properly securing the bunks ensures a safe and comfortable sleeping environment for users. Always prioritize safety and follow the instructions carefully. If you are unsure about any part of the process‚ consult the manual or contact customer support for guidance. Properly securing the bunks is a critical step in the assembly process. Take your time and ensure all connections are tight and secure. Avoid rushing through this step‚ as it directly impacts the bed’s safety and stability. Once the bunks are securely attached‚ you can proceed to add the mattresses and bedding. Always use the recommended mattress size and thickness to ensure proper fit and safety. If you plan to move the bed‚ ensure it is fully assembled and secure to prevent any shifting during transport. Regularly check the bed’s condition‚ especially after moving or reassembling it. Properly securing the bunks is the final step in ensuring the bed is safe and ready for use. Always follow the manufacturer’s instructions for the best results. If you notice any issues after assembly‚ address them promptly to maintain the bed’s safety and stability. Properly securing the bunks ensures a safe and comfortable sleeping environment for users. Always prioritize safety and follow the instructions carefully. If you are unsure about any part of the process‚ consult the manual or contact customer support for guidance. Properly securing the bunks is a critical step in the assembly process. Take your time and ensure all connections are tight and secure. Avoid rushing through this step‚ as it directly impacts the bed’s safety and stability. Once the bunks are securely attached‚ you can proceed to add the mattresses and bedding. Always use the recommended mattress size and thickness to ensure proper fit and safety. If you plan to move the bed‚ ensure it is fully assembled and secure to prevent any shifting during transport. Regularly check the bed’s condition‚ especially after moving or reassembling it. Properly securing the bunks is the final step in ensuring the bed is safe and ready for use. Always follow the manufacturer’s instructions for the best results. If you notice any issues after assembly‚ address them promptly to maintain the bed’s safety and stability. Properly securing the bunks ensures a safe and comfortable sleeping environment for users. Always prioritize safety and follow the instructions carefully. If you are unsure about any part of the process‚ consult the manual or contact customer support for guidance. Properly securing the bunks is a critical step in the assembly process. Take your time and ensure all connections are tight and secure. Avoid rushing through this step‚ as it directly impacts the bed’s safety and stability. Once the bunks are securely attached‚ you can proceed to add the mattresses and bedding. Always use the recommended mattress size and thickness to ensure proper fit and safety. If you plan to move the bed‚ ensure it is fully assembled and secure to prevent any shifting during transport. Regularly check the bed’s condition‚ especially after moving or reassembling it. Properly securing

Mattress Requirements and Specifications

Use only a twin mattress‚ 74-75 inches long and 37-38 inches wide‚ for both upper and lower bunks. Ensure the upper bunk mattress thickness exceeds 4 inches but does not surpass 6 inches for safety and proper fit. Always follow the manufacturer’s guidelines for mattress size and thickness to maintain stability and prevent accidents. Proper mattress sizing is crucial for the bed’s structural integrity and user safety. Always verify measurements before placing mattresses on the bunks. Ensure the mattress surface is at least 5 inches below the upper edge of the guardrails for added safety. Never exceed the recommended mattress thickness to avoid compromising the bed’s stability. Use only the specified mattress size to ensure a snug and secure fit. Always check for any damage or wear on the mattresses before use. Properly fitting mattresses are essential for comfort and safety. Follow all safety guidelines provided in the assembly instructions. Regularly inspect the mattresses for signs of damage or degradation. Replace any damaged mattresses immediately to maintain safety standards. Always prioritize safety when selecting and installing mattresses for the bunk bed. Ensure the mattresses are evenly placed and properly aligned on both bunks. Avoid using mattresses that are too thick or too thin‚ as this can affect the bed’s stability. Always use the recommended mattress size and thickness for optimal performance and safety. Consult the assembly manual for specific mattress requirements and guidelines. Ensure the mattresses are securely positioned and evenly distributed on both bunks. Regularly check the mattresses for any signs of sagging or damage. Replace worn-out mattresses promptly to maintain the bed’s safety and structural integrity. Always follow the manufacturer’s recommendations for mattress specifications to ensure the bunk bed remains stable and secure. Proper mattress installation is vital for user safety and comfort. Ensure the mattresses are compatible with the bed’s design and weight capacity. Always verify the mattress dimensions and thickness before placing them on the bunks. Properly fitting mattresses ensure a safe and comfortable sleeping environment. Follow all safety guidelines and manufacturer recommendations when selecting and installing mattresses. Regularly inspect the mattresses for any signs of wear or damage. Replace any unsuitable mattresses immediately to maintain safety standards. Always prioritize safety and comfort when choosing mattresses for the bunk bed. Ensure the mattresses are evenly placed and properly aligned on both bunks. Avoid using mattresses that do not meet the specified size and thickness requirements. Always use the recommended mattress size and thickness for optimal performance and safety. Consult the assembly manual for specific mattress requirements and guidelines. Ensure the mattresses are securely positioned and evenly distributed on both bunks. Regularly check the mattresses for any signs of sagging or damage. Replace worn-out mattresses promptly to maintain the bed’s safety and structural integrity. Always follow the manufacturer’s recommendations for mattress specifications to ensure the bunk bed remains stable and secure. Proper mattress installation is vital for user safety and comfort. Ensure the mattresses are compatible with the bed’s design and weight capacity. Always verify the mattress dimensions and thickness before placing them on the bunks. Properly fitting mattresses ensure a safe and comfortable sleeping environment. Follow all safety guidelines and manufacturer recommendations when selecting and installing mattresses. Regularly inspect the mattresses for any signs of wear or damage. Replace any unsuitable mattresses immediately to maintain safety standards. Always prioritize safety and comfort when choosing mattresses for the bunk bed. Ensure the mattresses are evenly placed and properly aligned on both bunks. Avoid using mattresses that do not meet the specified size and thickness requirements. Always use the recommended mattress size and thickness for optimal performance and safety. Consult the assembly manual for specific mattress requirements and guidelines. Ensure the mattresses are securely positioned and evenly distributed on both bunks. Regularly check the mattresses for any signs of sagging or damage. Replace worn-out mattresses promptly to maintain the bed’s safety and structural integrity. Always follow the manufacturer’s recommendations for mattress specifications to ensure the bunk bed remains stable and secure. Proper mattress installation is vital for user safety and comfort. Ensure the mattresses are compatible with the bed’s design and weight capacity. Always verify the mattress dimensions and thickness before placing them on the bunks. Properly fitting mattresses ensure a safe and comfortable sleeping environment. Follow all safety guidelines and manufacturer recommendations when selecting and installing mattresses. Regularly inspect the mattresses for any signs of wear or damage. Replace any unsuitable mattresses immediately to maintain safety standards. Always prioritize safety and comfort when choosing mattresses for the bunk bed. Ensure the mattresses are evenly placed and properly aligned on both bunks. Avoid using mattresses that do not meet the specified size and thickness requirements. Always use the recommended mattress size and thickness for optimal performance and safety. Consult the assembly manual for specific mattress requirements and guidelines. Ensure the mattresses are securely positioned and evenly distributed on both bunks. Regularly check the mattresses for any signs of sagging or damage. Replace worn-out mattresses promptly to maintain the bed’s safety and structural integrity. Always follow the manufacturer’s recommendations for mattress specifications to ensure the bunk bed remains stable and secure. Proper mattress installation is vital for user safety and comfort. Ensure the mattresses are compatible with the bed’s design and weight capacity. Always verify the mattress dimensions and thickness before placing them on the bunks. Properly fitting mattresses ensure a safe and comfortable sleeping environment. Follow all safety guidelines and manufacturer recommendations when selecting and installing mattresses. Regularly inspect the mattresses for any signs of wear or damage. Replace any unsuitable mattresses immediately to maintain safety standards; Always prioritize safety and comfort when choosing mattresses for the bunk bed. Ensure the mattresses are evenly placed and properly aligned on both bunks. Avoid using mattresses that do not meet the specified size and thickness requirements. Always use the recommended mattress size and thickness for optimal performance and safety. Consult the assembly manual for specific mattress requirements and guidelines. Ensure the mattresses are securely positioned and evenly distributed on both bunks. Regularly check the mattresses for any signs of sagging or damage. Replace worn-out mattresses promptly to maintain the bed’s safety and structural integrity. Always follow the manufacturer’s recommendations for mattress specifications to ensure the bunk bed remains stable and secure. Proper mattress installation is vital for user safety and comfort. Ensure the mattresses are compatible with the bed’s design and weight capacity. Always verify the mattress dimensions and thickness before placing them on the bunks. Properly fitting mattresses ensure a safe and comfortable sleeping environment. Follow all safety guidelines and manufacturer recommendations when selecting and installing mattresses. Regularly inspect the mattresses for any signs of wear or damage. Replace any unsuitable mattresses immediately to maintain safety standards. Always prioritize safety and comfort when choosing mattresses for the bunk bed. Ensure the mattresses are evenly placed and properly aligned on both bunks. Avoid using mattresses that do not meet the specified size and thickness requirements. Always use the recommended mattress size and thickness for optimal performance and safety. Consult the assembly manual for specific mattress requirements and guidelines. Ensure the mattresses are securely positioned and evenly distributed on both bunks. Regularly check the mattresses for any signs of sagging or damage. Replace worn-out mattresses promptly to maintain the bed’s safety and structural integrity. Always follow the manufacturer’s recommendations for mattress specifications to ensure the bunk bed remains stable and secure. Proper mattress installation is vital for user safety and comfort. Ensure the mattresses are compatible with the bed’s design and weight capacity. Always verify the mattress dimensions and thickness before placing them on the bunks. Properly fitting mattresses ensure a safe and comfortable sleeping environment. Follow all safety guidelines and manufacturer recommendations when selecting and installing mattresses. Regularly inspect the mattresses for any signs of wear or damage. Replace any unsuitable mattresses immediately to maintain safety standards. Always prioritize safety and comfort when choosing mattresses for the bunk bed. Ensure the mattresses are evenly placed and properly aligned on both bunks. Avoid using mattresses that do not meet the specified size and thickness requirements. Always use the recommended mattress size and thickness for optimal performance and safety. Consult the assembly manual for specific mattress requirements and guidelines. Ensure the mattresses are securely positioned and evenly distributed on both bunks. Regularly check the mattresses for any signs of sagging or damage. Replace worn-out mattresses promptly to maintain the bed’s safety and structural integrity. Always follow the manufacturer’s recommendations for mattress specifications to ensure the bunk bed remains stable and secure. Proper mattress installation is vital for user safety and comfort. Ensure the mattresses are compatible with the bed’s design and weight capacity. Always verify the mattress dimensions and thickness before placing them on the bunks. Proper

Troubleshooting Common Assembly Issues

Recommended Mattress Size and Thickness

For a Twin Over Twin Metal Bunk Bed‚ use a twin mattress measuring 74-75 inches long and 37-38 inches wide for both the upper and lower bunks. The mattress thickness for the upper bunk must be greater than 4 inches but not exceed 6 inches to ensure proper fit and safety. The mattress surface should be at least 5 inches below the upper edge of the guardrails. Always follow these specifications to maintain stability and prevent accidents. Proper mattress sizing is essential for the bed’s structural integrity and user safety. Verify measurements before installation to ensure compatibility and a secure fit. Ensure the mattress thickness does not compromise the bed’s stability or safety features.