instructions for treadmill stress test

A treadmill stress test evaluates heart function under physical exertion, using ECG and blood pressure monitoring to assess cardiovascular health and detect potential issues like coronary artery disease.
1.1 What is a Treadmill Stress Test?
A treadmill stress test is a non-invasive medical assessment used to evaluate heart function under physical stress. During the test, the patient walks on a treadmill that gradually increases in speed and incline to simulate exercise. Electrocardiography (ECG) and blood pressure monitoring are used to track heart activity and detect abnormalities. The test helps identify how the heart responds to physical exertion, allowing doctors to diagnose conditions such as coronary artery disease (CAD) or irregular heart rhythms. It is a widely used diagnostic tool in cardiology, providing valuable insights into cardiovascular health. The exercise protocol typically lasts between 7 to 12 minutes, and the test is conducted in a controlled environment for safety and accuracy.
1.2 Purpose and Benefits of the Test
The primary purpose of a treadmill stress test is to assess the heart’s ability to function under physical exertion, helping diagnose conditions like coronary artery disease (CAD) or arrhythmias. It evaluates blood flow, heart rate, and rhythm during exercise, providing insights into cardiovascular health. The test is beneficial for identifying chest pain causes, monitoring heart disease progression, and ensuring safe exercise levels for patients with heart conditions. It also aids in assessing the effectiveness of treatments, such as bypass surgery or angioplasty. By simulating physical stress in a controlled environment, the test allows doctors to detect potential issues early, improving patient outcomes and guiding personalized treatment plans. Its non-invasive nature and precise results make it a valuable diagnostic tool for maintaining heart health and preventing complications.
1.3 Who Should Undergo the Test?
A treadmill stress test is recommended for individuals experiencing symptoms like chest pain, shortness of breath, or irregular heartbeats, as well as those with known or suspected heart conditions. It is particularly beneficial for patients with coronary artery disease (CAD), high blood pressure, or arrhythmias. Individuals at high risk of cardiovascular diseases, such as those with diabetes, obesity, or a family history of heart disease, should also consider undergoing the test. Additionally, it is useful for evaluating exercise tolerance and ensuring safety for older adults or those starting a new exercise program. Doctors may also recommend it for patients recovering from heart procedures or surgeries to assess their progress; Regular testing helps monitor heart health and prevent complications, making it a crucial diagnostic tool for maintaining cardiovascular well-being.
Preparing for the Treadmill Stress Test
Ensure medical clearance, avoid heavy meals, wear comfortable clothing, and bring necessary items like medications or ID. Refrain from caffeine and nicotine, and arrive early for check-in.
2.1 Medical Clearance and Consultation
Before undergoing a treadmill stress test, it is essential to obtain medical clearance. Schedule a consultation with your doctor to discuss your medical history, current health conditions, and any medications you are taking. This step ensures that the test is safe for you and that any potential risks are minimized. Your doctor will review your health status, including any heart conditions, and determine if there are any reasons to avoid the test. Additionally, inform your doctor about any symptoms you are experiencing, such as chest pain or shortness of breath, as this may influence the test protocol. Clear communication with your healthcare provider is crucial to ensure a safe and effective evaluation. Always follow their specific instructions and guidance before the test.
2.2 Dietary and Activity Instructions
To prepare for a treadmill stress test, follow specific dietary and activity guidelines. Avoid eating a heavy meal for at least 4 hours before the test, as this can cause discomfort during exercise. Refrain from consuming caffeine or nicotine, as these substances can interfere with heart rate and blood pressure readings. Wear loose, comfortable clothing and sturdy walking shoes suitable for exercise. Women should avoid wearing underwire bras. Stay hydrated by drinking water as needed, but avoid excessive fluid intake. Avoid strenuous physical activity for 24 hours before the test to ensure accurate results. Inform your doctor if you have any concerns or physical limitations. Adhering to these instructions will help ensure a safe and effective test. Always follow your doctor’s specific advice to prepare properly for the treadmill stress test.
2.3 Clothing and Personal Items to Bring
When preparing for a treadmill stress test, it’s essential to wear appropriate clothing and bring necessary personal items. Wear loose, lightweight, and comfortable clothing that allows for ease of movement, such as t-shirts, shorts, or sweatpants. Avoid tight or restrictive clothing that may interfere with the test. Women should refrain from wearing underwire bras, as they may cause discomfort or interfere with ECG electrodes. Bring a pair of sturdy walking shoes or sneakers suitable for exercise. Additionally, consider bringing a change of clothes if you plan to shower after the test. Bring your insurance cards, identification, and any relevant medical information. Avoid wearing heavy jewelry or accessories that may interfere with the equipment. Lastly, bring a water bottle to stay hydrated before and after the test. Proper preparation ensures a smooth and comfortable experience during the treadmill stress test.

Conducting the Treadmill Stress Test
The test involves ECG monitoring and blood pressure checks while walking on a treadmill, starting at a slow pace and gradually increasing intensity to assess heart function under stress.
3.1 Setting Up the Equipment

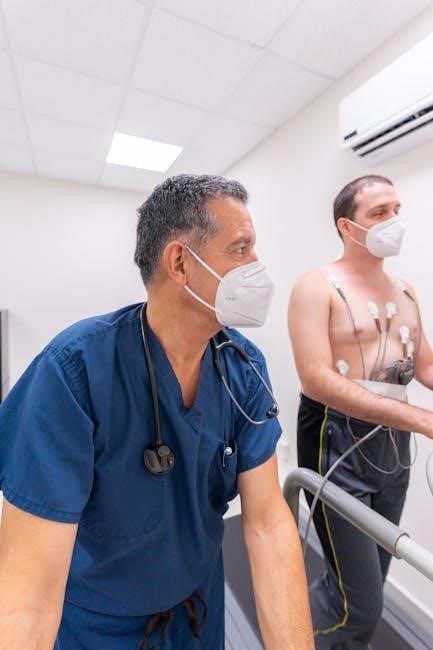
Setting up the equipment for a treadmill stress test involves preparing the treadmill, ECG machine, and blood pressure monitor. The treadmill is calibrated to ensure accurate measurements, and the ECG electrodes are placed on the patient’s chest to monitor heart activity. A blood pressure cuff is secured on the arm, and all devices are connected to a central monitoring system. The test is conducted in a controlled environment with healthcare professionals present to oversee the process. The equipment is checked for proper function, and emergency response plans are in place. The treadmill is programmed with a standardized exercise protocol, starting at a slow pace and gradually increasing in intensity. This setup ensures accurate data collection and patient safety throughout the test.
3.2 Monitoring During the Test
During the treadmill stress test, continuous monitoring of the patient’s heart activity, blood pressure, and overall condition is conducted. Electrocardiogram (ECG) electrodes record heart rhythms in real-time, while blood pressure is measured at regular intervals. The healthcare team observes for signs of distress, such as chest pain, dizziness, or shortness of breath, which may indicate underlying heart issues. The treadmill’s speed and incline are adjusted according to the exercise protocol, and the patient’s symptoms and vital signs are closely tracked. If any abnormal readings or severe symptoms occur, the test may be paused or terminated early. The monitoring ensures both the safety of the patient and the accuracy of the test results, providing valuable insights into cardiovascular health.

3.3 Exercise Protocol and Stages
The exercise protocol for a treadmill stress test typically begins with a baseline electrocardiogram (ECG) and blood pressure reading. The test starts at a low intensity, with the treadmill moving at a slow speed and minimal incline. Every 1-3 minutes, the intensity increases by elevating the incline or speeding up the treadmill to simulate progressively strenuous exercise. The goal is to achieve a target heart rate, usually 85% of the maximum predicted heart rate based on age. Patients are encouraged to report any symptoms, such as chest pain or shortness of breath. The test continues until the target heart rate is reached, symptoms occur, or exhaustion sets in. The structured protocol ensures a standardized and safe assessment of cardiovascular response to physical stress.

After the Test
After the test, patients undergo a supervised cool-down period. Vital signs are monitored to ensure recovery. The doctor then discusses the results, explaining findings and next steps.
4.1 Cool Down and Recovery
The cool-down phase is essential after the treadmill stress test to ensure a safe transition back to rest. Patients are usually monitored for 5-10 minutes post-exercise. During this time, heart rate and blood pressure are closely observed to check for any abnormalities. It is crucial to avoid sudden stops or sitting down immediately, as this can cause dizziness or fainting. Patients may be advised to walk slowly or stand still for a few minutes before sitting. The healthcare team will also ensure that vital signs return to baseline levels. Proper recovery helps prevent complications and allows for accurate interpretation of test results. Patients are often encouraged to wear loose, comfortable clothing and avoid strenuous activities for the remainder of the day. This step ensures overall safety and comfort following the test.
4.2 Discussing Results with the Doctor
After the treadmill stress test, your doctor will review the results with you. This discussion is crucial for understanding your heart’s performance under stress. The doctor will explain if the results are normal or if any abnormalities were detected, such as arrhythmias or signs of coronary artery disease. Based on the findings, the doctor may recommend lifestyle changes, medication, or further testing. It’s important to ask questions during this conversation to fully grasp your health status and any necessary next steps. This dialogue ensures you are informed and involved in your care plan.